
Model: menus and tables
Model is where Formuvia's own structure lives. What you add here becomes a menu item on the left and, for a table, a real table in the database.
You reach it from Administration / Model. It is a tree, and the tree is the application.
WARNING
Everything on this page changes the database. Adding a table creates it; deleting a table drops it with everything in it. Read Deleting before you use ⋯ → Delete.
How the tree is built
What is in effect today
A table added here is really created in the database, with its code, its columns and its permissions, and it appears in the menu under its parent item, where it opens as a list. Add and Edit on that list open the entry dialog laid out as you set it here and in Form design, and the ⋯ button on a row deletes the record. A subtable of such a table is reached from the ⋯ menu of a row, like everywhere else.
The root is Model. Under it the rules are fixed:
- under the root go menus — a menu only groups things in the navigation, it has no data of its own
- under a menu go tables
- under a table go subtables — a table whose records belong to a record of the table above it
A subtable is what makes Related tables appear in the ⋯ menu of a row: open a customer and you get to that customer's orders. The chain can be as deep as you need.
Each row of the tree has a + button that adds the right kind of child — Add menu, Add table or Add subtable, depending on where you are — and a ⋯ button with Edit, Delete, Form design (tables only), Import from a folder (only a table straight under a menu) and History.
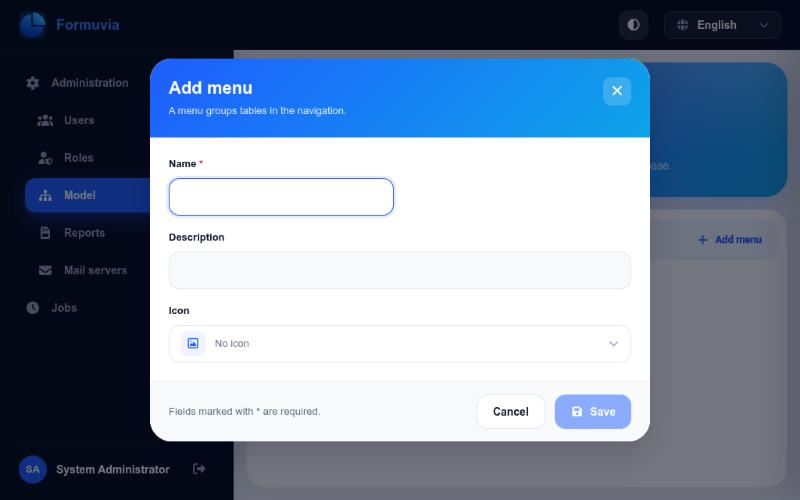
Adding a menu
A menu needs only a name and an icon. The name is what people see in the navigation; the icon is picked from a searchable list.
Adding a table
A table needs more, because a table is real.
Name and code
Name is what people read. Code is the name of the table in the database: lowercase letters, digits and underscore, starting with a letter, up to 56 characters.
Choose the code carefully — once the table exists in the database it cannot be renamed, and the field is locked from then on.
Who may do what
A table has four roles, and they are separate on purpose:
| View role | may open the table and read it |
| Add role | may enter new records |
| Edit role | may change existing records |
| Delete role | may delete records |
Someone can be allowed to enter orders without being allowed to delete them. The roles themselves are managed in Users and roles.
The entry dialog
The last part describes the form for entering data into this table — how wide it is and how many places it has for fields:
- Dialog width in pixels, at least 400
- Columns in the dialog — 1 to 12
- Rows in the dialog — at least 1
A preview under the fields shows the grid as you change the numbers. You are not placing any fields yet; that is Form design. Here you only decide how big the form is.
TIP
If the table already has fields, the grid cannot be made smaller than what those fields occupy. Formuvia tells you the smallest number that still fits. Move or delete the fields first, then shrink the grid.
The table is created in the database the moment you save.
Procedures
At the bottom of the dialog stands Procedures: procedures of the database that can be run over one record of this table. A procedure is work the database does by itself — recalculating a document, closing a period, numbering an invoice — and Formuvia only sets it off and shows the result.
This part appears once the table is saved. Add a procedure asks for three things:
- Name — what the user will see in the ⋯ menu of the list. Give it a name that says what it does: Recalculate, Close.
- Icon — the picture that stands beside that name in the menu, chosen the same way as the icon of a table. Left empty, the procedure gets the gears.
- Procedure of the database — chosen from the procedures the database holds. Only a procedure that takes one parameter, the identifier of the record, can be used here; Formuvia refuses a name the database does not know.
Click a procedure in the list to change it, or the basket to take it off the table. Taking it off removes only the entry in Formuvia — the procedure itself stays in the database.
Who may run it follows the table: the same role that may change a record may run a procedure over it, because that is what a procedure does. It is offered in two places: the ⋯ menu of the list, and the tab next to Save in the entry dialog. How it is run is in Working with tables.
Triggers
Under the procedures stands Triggers: functions of the database that the database itself runs whenever a row of this table is written. Nothing in Formuvia sets them off — there is no button and no menu entry for them. A trigger is for what has to happen every single time, no matter who writes the row or from where: writing a sum into a header, stamping a record, refusing a value the form cannot check on its own.
This part appears once the table is saved. Add a trigger asks for a name, the moment, the event and the function, and lets you narrow it with a condition:
- Name — the name the trigger gets in the database: lowercase letters, digits and underscore, starting with a letter. It cannot be changed afterwards; to rename it, delete it and add it again. Two names are taken:
create_auditandtable_listenstand on every table for the history and for reporting a change, so Formuvia refuses them. - When — Before the write or After the write. Before, the function still has the row in its hands and can change or refuse it; after, the row is already written and the function works around it. There is nothing in between, and when two triggers stand on the same moment the database decides in which order they run — so do not build on that order.
- On — what sets it off: an insert, an update, both, a delete, or any of the three.
- Function of the database — chosen from the functions the database holds that return
trigger. Such a function takes no parameters and works overNEWandOLD. A name the database does not know is refused. - Condition — optional, written over
NEWandOLDwithoutWHEN, for exampleNEW.amount <> OLD.amount. Left empty, the trigger runs over every row.
Click a trigger in the list to change it, or the basket to take it off the table. Taking a trigger off drops it from the database as well — that is the difference from a procedure, where only the entry in Formuvia goes. The function itself stays in the database either way.
What a trigger writes is in the record straight away: the entry dialog is filled in again after saving, so a value the database put there stands in the form and in the list without anyone asking for it.
Reports
The last part is Reports: reports of JasperReports tied to this table, each one made over a single record of it.
This part appears once the table is saved. Add a report asks for two things:
- Name of the report — what the user reads over the record. It is unique within the table.
- File of the report — a report compiled by Jaspersoft Studio, the one with the
.jasperextension; the source.jrxmlis not taken. The file is read the moment it is sent, and it is accepted only if it is really a compiled report and if it takes a parameteridof typeObject— that parameter is the record the report is made over. Anything else is refused, with the reason. The identifier is handed over as it is, so the query of the report says what it is:where id = cast($P{id} as uuid).
Click a report in the list to change it. Changing only the name keeps the file as it is; choosing a new file replaces it. The basket takes the report off the table and the file of the report goes with it.
The report is then offered in the ⋯ menu of every row of that table, under its name: choosing it makes the report over that record and opens the finished PDF in the reader inside the application. It is offered to anyone who may read the table, since making a report changes nothing. The tab next to Save in the entry dialog offers the same ones as Save and print: the record is stored and the report is made over it at once. See What else a row can do.
TIP
Leave the font out of the report and it gets the one the server offers, which has š, đ, č, ć and ž in it. A report that names a font of its own needs that same font on the server; if it is not there, making the report fails and says which font is missing.
Import from a folder
A table can take its data from files as well as from people. ⋯ → Import from a folder on a table opens the jobs that do it: each one looks into a folder on the server at the time it is given, takes the filled-in entry templates of this table it finds there, and writes their rows into the table. Whoever makes the data — another program, a colleague, an export from an old system — only has to leave the file in that folder.
The item stands only on a table straight under a menu. A subtable does not have it: its rows belong to a record of the table above it, and a file left in a folder cannot say which record that is.
How it goes
The page says it at the top, under How the import works, and it is the same four steps every time:
- Fill in the template. It is downloaded from the list of the table with Template and filled in the usual way. Download it again after the form design changes, or the import will not recognise its columns.
- Put the file into the folder of the job. Only
.xlsxfiles are taken. When the job has a file name, only the files whose name begins with it are taken: withkonta, bothkonta.xlsxandkonta-march.xlsxgo in,accounts.xlsxdoes not. - The job imports it — at the time set in its timetable, at once with ▶ on the Jobs page, or when another program calls its webhook.
- Check the outcome. A file that went in is moved into a folder called
backupinside the folder of the job; a file that did not go in is moved intoerror. Either way it is no longer in the folder, so the next run does not take it again.
Every file goes in as a whole, just like with Import in the list: if one row is not accepted, nothing from that file is written. The other files of the same run are not held back by it. A run in which any file did not go in is marked Failed, its error lists those files, and it goes to the address for errors of the job.
The error of the job says which file, not which row. To see the row and what is wrong with it, import that same file by hand with Import in the list of the table — the message there says it — then fix the file and copy it back into the folder of the job.
TIP
The page opens with the four steps unfolded while the table has no job yet, and folded once it has one, so the list gets the room. Click the heading to open or fold them; the page remembers the choice.
The form of an import job
Add opens a shorter form than the one of a report: an import job only imports, so its kind is not chosen, and nothing about mail or the kind of file is asked.
- Name — the job stands in the scheduler under it, and it cannot be changed afterwards, exactly as with the jobs of a report.
- Folder — the folder on the server, written in full, for example
/var/formuvia/import/konta. Not a folder on your own computer: the job runs on the server and looks there. The server has to be allowed to read the folder and to write into it, because it makesbackupanderrorinside it by itself. - File name — not required. Only the files whose name begins with it are imported; left empty, every
.xlsxin the folder is. - Mail server and Address for errors — where word goes when a run does not go through; without them the error is only written down.
- Role, On and the timetable — the same as for any other job; see When it runs.
The job writes the rows without asking for the add role of the table: it is the administrator who makes the job, and from then on anyone who can put a file into the folder brings data into the table. Choose the folder with that in mind.
The webhook keys of an import job are in the row menu, under Webhook, the same as for the job of a report (Running a job from the outside).
Editing
⋯ → Edit opens the same form. The name, the description, the icon, the roles and the size of the entry dialog can all be changed at any time.
The code cannot — the table exists in the database under that name.
Deleting
⋯ → Delete on a table deletes the table from the database together with every record in it. It cannot be undone, and Formuvia says so before doing it.
A menu that still has items under it cannot be deleted; delete what is inside it first.
History
⋯ → History shows the changes to that node of the model — who added the table, who changed its roles, who widened its dialog and when. The same history every ordinary record has.
What comes next
A table exists now, but it has no fields yet. Open ⋯ → Form design and put them in.